| Ricoh MP C5503 Color Copier User Guide |
|
1. Logon the copier for scanning and copying
2. Logout the copier
3. Scanning to Email
4. Printing
5. Normal Print & Locked Print
6. FAQs |
| |
| A. Logon the copier for scanning and copying |
| |
For teaching staff
Teaching staff need to activate CU Link card before copying for the first time. If you do not activate yet and add value, please contact Angela or Celia for activation first. Later, you can swipe your CU Link card on the card reader to logon the copier.

For department staff or project users
Logon the copier with a printing code assigned by Faculty Office.
Input the code to [ID Number] field and press [Login] to logon.
|
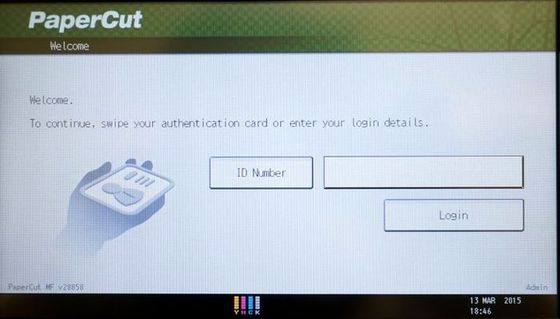
PaperCut Logon Screen |
| Tips: If the touch screen does not display "PaperCut Logon Screen", press the [Login/Logout] key to show the logon screen. |
 |
| B. Logout the copier |
| |
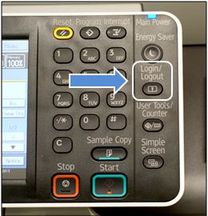 After copying or scanning, press the [Login/Logout] key or swipe the CU Link card to logout. After copying or scanning, press the [Login/Logout] key or swipe the CU Link card to logout. |
|
| C. Scanning to Email |
| |
MP5503 copier has "Scan to E-mail" function through which you can scan your documents into PDF format and mail to your account. |
| 1. |
Input identity number or swipe your CU Link Card to logon the copier. Press [Scanner] to switch to scanner function. |
 |
| 2. |
Insert the original copy into the feeder or on the platen
glass. It is not recommended to scan more than 50 pages for each job otherwise you cannot recieve your scanned document by email. |
| 3. |
The
default file format of the output file is PDF. Press the button [Send File
Name/Type] if you want to select TIFF format. |
| 4. |
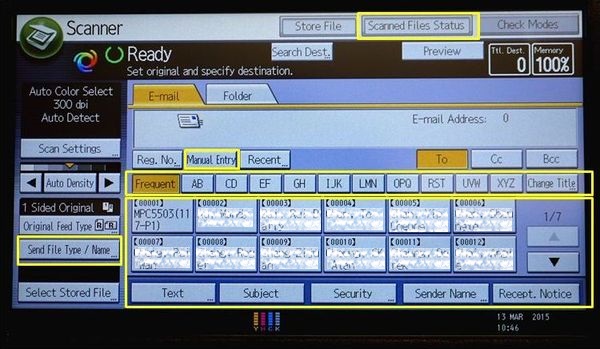
The e-mail addresses of the faculty members were preset in the copier. The recipients' names are arranged by the surnames in alphabetical order. You can press the arrow keys to go to another page if you cannot find your recipient(s) on the current page. |
 |
| 5. |
The "Title" keys can direct you to the pages where the recipients are ordered by the
initials of surnames that you select on the keys. |
 |
| 6. |
If you want to input e-mail address manually, press the key
[Manual Entry] and input the e-mail address. |
| 7. |
Finally,
press [Start] to start the scanning process. |
| 8. |
To
check if the files are successfully sent. Select [Scanned Files Status] to
check the transmission status. [Trnsmtg] means the
file is transmitting to email server and [Completed] refers to the files is successfully
sent to your email account. |
| 9. |
To logout the copier, swipe the CU Link card or press the [Login/Logout] key. |
|
| D. Printing |
| 1. |
Print with customized printing
settings on PCL 6 driver |
| |
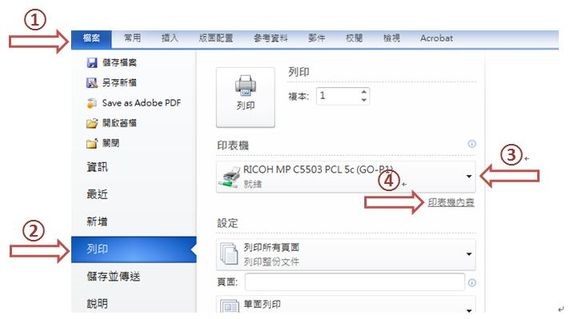
1. |
For example, in MS Word, select [File] -> [Print] option. On "Printing" page, select "RICOH MP C5503 PCL 6" and click [Printer
Properties]. |
 |
| 2.
|
RICOH MP C5503 PCL 6 Property:- |
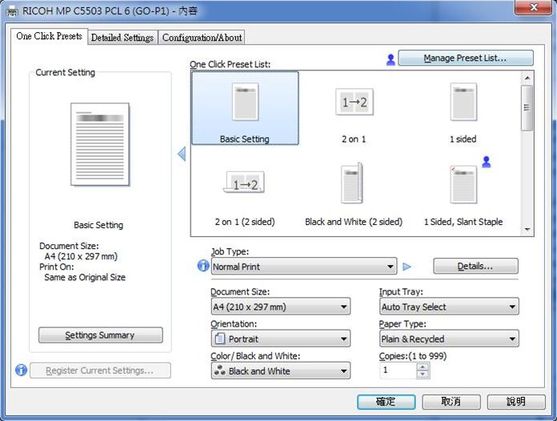 |
| 3. |
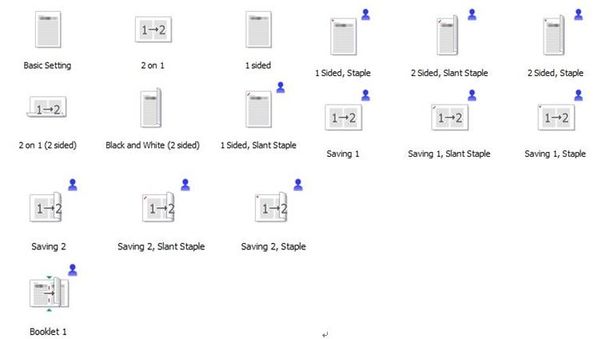
Some customized templates were preset for you when you
installed the printer. And you should utilize these templates to finish your
printing jobs. |
 |
| All templates are created for Black and White printing, you can change to color printing under [Color / Black and White:]. |
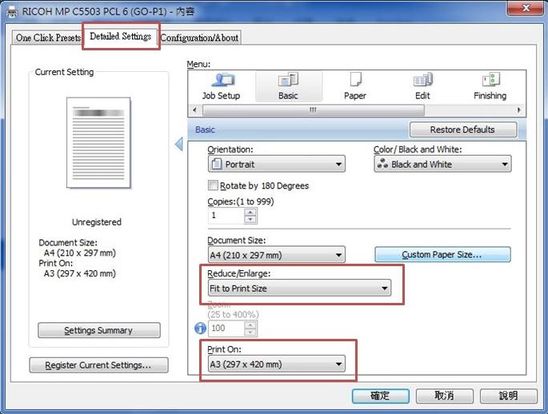
| 4. |
After
choosing the style, you may print the document on a different size paper, such
as A3 rather than A4 size.Select [Detail Settings] page. Select the A3 paper under [Print On:] and select
[Fit to Print Size] under [Reduce/Enlarge:] if you want the printout to fit the
paper size. |
 |
| |
| 2. |
Normal Print |
| |
Normal Print should be the default job type you always used
to choose. It allows you to print the documents directly without any special
security requirements, such as input the password before actually printing to
copier (Locked Print). |
| |
| 3. |
Locked Print |
| |
Locked Print allows you to print your document more privately
by holding the print job and restart printing at the copier with your password. |
| 1. |
For
example, in MS Word, select [File] -> [Print] and select [Printer Properties] on "Printing" page. |
| 2. |
On "One Click Presets" page, select "Locked Print" under [Job Type] and click [Details…]. |
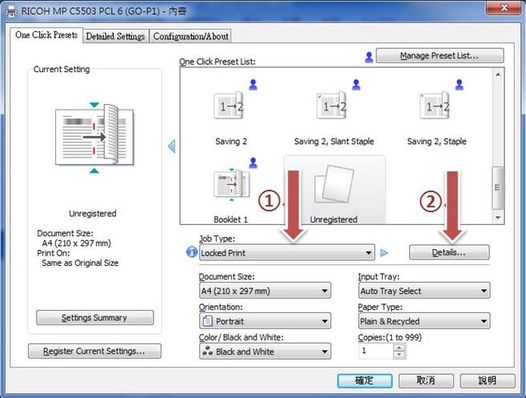 |
| 3. |
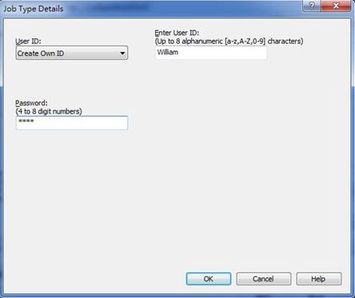
Type a user id with length up to 8 characters, which is used to identify your print job stored in the copier. Input a password which is used to unlock the print job at the copier. |
 |
| 4. |
Back to "Printing" page and click "Print" to print the document. |
| 5. |
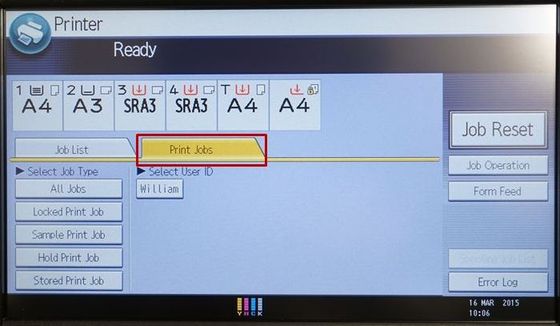
At
the copier, switch to printer function by pressing the button [Printer]. Select
[Print Jobs] tab to list the print jobs. |
| |
 |
| 6. |
Select the print job you submitted and press [Print]. |
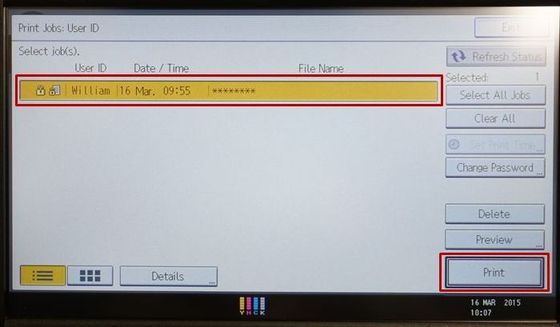 |
| 7. |
Input
the password and click [OK]. |
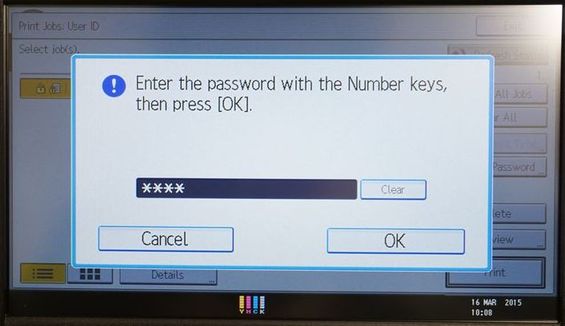 |
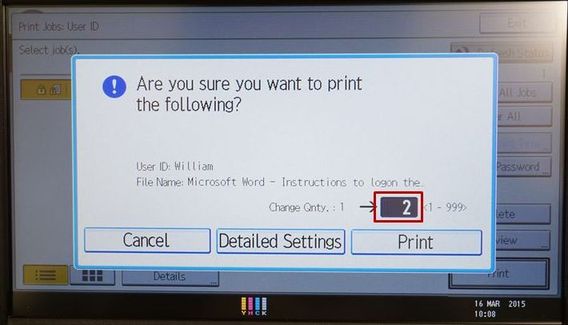
| 8. |
Select [Print] to start printing. You can change the quantity before printing if you want to
print more than one copy. |
 |
|
| E. FAQs |
| 1. |
About Errors on Copier Logon |
| |
1. |
"You do not have the privileges to use this function." prompts when you switch to copying function on the copier. |
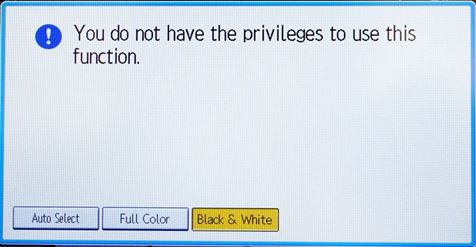 |
| Your account may run out of credits. Please contact Angela or Celia to add value to your account. |
|
| 2. |
"Unsuccessful authentication. Please press OK and try again." prompts when you try to logon the copier. |
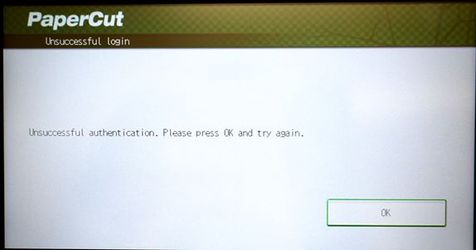 |
| You do not activate your CU Link card yet or input invalid printing code. Please contact Angela or Celia to check your account. |
|